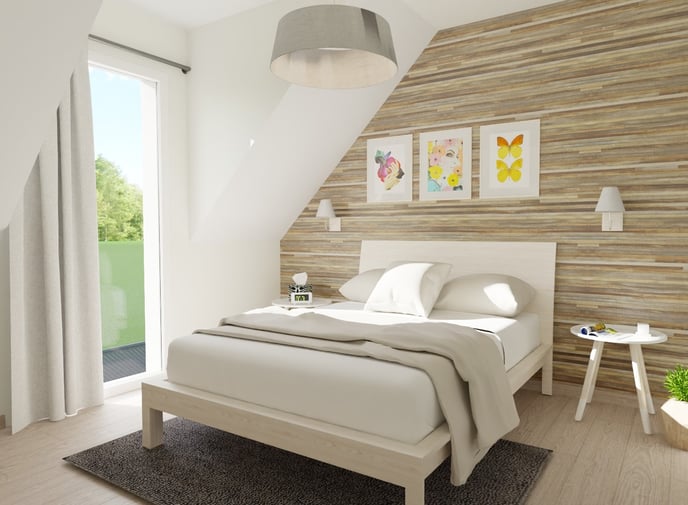
- 'Layout' Step: Customize your rooms, walls and ceilings
- 'Opening' Step: Select your roof window positions
- 'Roof' Step: Represent different roof thicknesses
- 'Plan details' Step: Customize various surfaces
'Layout' Step: Customize your rooms, walls and ceilings
To arrange your attic spaces, specific options within the 'Layout' step will allow you to customize their representation for your visuals (3D) as well as for your section plans (2D).
- Rooms: They have default properties (or you can customize them yourself). These properties will influence the management of your surfaces and the representation of your attics - see Part III "Rooms: Special Cases" of the tutorial dedicated to editing rooms in Cedreo.
/2-03%20cut%20ceiling%20option.png?width=160&height=30&name=2-03%20cut%20ceiling%20option.png) Walls and ceilings: When selecting a wall/partition (not valid for exterior walls), in its parameters, you can choose whether to have it cut (or not) by the ceilings (and sloping ceilings, under the roof).
Walls and ceilings: When selecting a wall/partition (not valid for exterior walls), in its parameters, you can choose whether to have it cut (or not) by the ceilings (and sloping ceilings, under the roof).- Living areas: From the 'Surface Areas' tool available in the 'Layout' step, you can customize the minimum height of living area and their display to facilitate your tracing.
/0-13%20Define%20living%20area.gif?width=655&height=541&name=0-13%20Define%20living%20area.gif)
'Opening' Step: Select your roof window positions
The 'Opening' step offers a specific catalog entry for the 'Roof'. Here you will find various models of roof windows.
Once you have inserted one or more roof windows, you can customize their type of trim.
/4-23%20Hybride.jpg?width=217&height=122&name=4-23%20Hybride.jpg)
Hybrid Visual Rendering |
/4-23%20Classique.jpg?width=217&height=122&name=4-23%20Classique.jpg)
Classic Visual Rendering |
/4-23%20Optimal.jpg?width=688&height=387&name=4-23%20Optimal.jpg)
Optimal Visual Rendering |
The roof windows and their trim type will appear on the section plans and will be adapted to the finished thickness of your roofs.
/4-23%20Repr%C3%A9sentation%20velux%20plan%20de%20coupe.png?width=496&height=301&name=4-23%20Repr%C3%A9sentation%20velux%20plan%20de%20coupe.png)
(Here, the example of a representation of a roof window with 'Hybrid' trim)
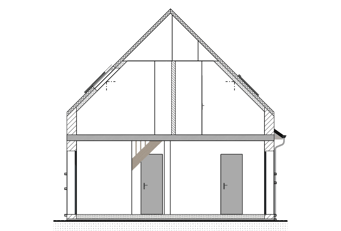
'Roof' Step: Represent different roof thicknesses
The dimensions that you can customize on your different roofs will have an immediate impact on the 3D appearance of your project as well as on the section plans edited on your project.
After understanding the management of the different heights on Cedreo, you can customize the thickness of your roofs as well as the placement of your dormers and skylights.
'Plan details' Step: Customize various surfaces
In this step, you will find the menu dedicated to 'Surface Tables'. With 3 sub-menus:
/2-05%20Technical%20room%20specifity.png?width=300&height=121&name=2-05%20Technical%20room%20specifity.png) Summary Surfaces >provides a summary of the overall surfaces, allows you to control the % of glazed surface and its orientation... but also to display on the plan the total internal and living areas.
Summary Surfaces >provides a summary of the overall surfaces, allows you to control the % of glazed surface and its orientation... but also to display on the plan the total internal and living areas.- Detailed surfaces> provides the surfaces of the different rooms, to customize whether or not they are taken into account (in living or annex surfaces)
- Floor area > allows you to visualize the total floor area and to customize the presence or absence of different spaces in this floor area.
You will then need to validate all this work by creating
beautiful interior visuals and customizing your section plans.
 |
 |
You can find here the webinar replay "Manage your surfaces and attics".