❗The preparation steps between 'Layout' and 'Exterior' presented in this tutorial can be conducted in any order you choose.
In the given scenario, we will illustrate a 4-foot variation in elevation between two sections of the building. To address this, we will construct a retaining wall on our property to ensure proper leveling.
Layout and Roof Steps: Create Your Building Offset
1 - From the right column, in the 'Layout' step, modify the dimension values of the ground floor. Enter the highest expected 'finished floor' value (here 4' + 7 3/4" by default, i.e. 4'-7 3/4").
2 - Modify the dimension values of the lowest rooms of the project, changing them one after the other to 7 3/4".
⚠️ Make sure to switch to the left tab dedicated to the the level (instruction 1) 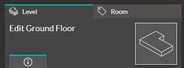
And the right tab dedicated to the rooms (instruction 2) when changing dimensions. 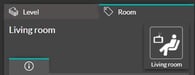

2 - Add a partial floor, by tracing only the exterior walls of the upper part of the project.

3 - Go to the 'Roof' step. On the first floor (partial floor), draw a classic roof.
4 - Go to the ground floor to draw the roof of the lowest part of the project.
5 - Change the height of the roof in the right column (default 11 3/4"). Give it desired value on the level (here, for example 11').
💡 The roof serves as a 'wall cutter'. The role of the walls is to fill the underside of the roofs and the role of the roofs is to free up more or less masonry!

Exterior Step: Show your ground elevations
❗You could represent your terrain elevations by adding points ('Layout' step). But in this case, we think it is better to use the tools in the 'Exterior' step.
1 - Go to the 'Exterior' step and, using the 'Spaces' tools and/or the 'Paths' tools, represent the different exterior spaces of the upper part of the project.

2 - By selecting each space, in the right-hand column, modify the elevations. In the example here, to create the effect of 'raised terrace', select 'Horizontal' in the type of elevation.
3 - Enter the desired elevation value, here 4' (the paths, in 'Ground terrain' elevation, will adapt automatically).

4 - Refine the layout of the raised terrace by adding a retaining wall along your space.
💡 Add points on the edge of your space, to be able to customize your retaining wall (remove a part) and install for example an outdoor staircase.

